Part 3 Installation
Although my floor level being about a meter above ground level, meant that the tank could be above ground – I decided to bury the tank so it was out of the way and less of an eye sore.

Tank Installtion - backfilling
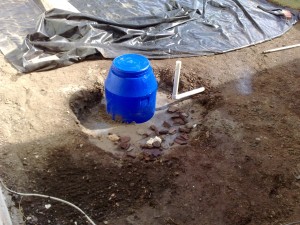
Most plastic tanks are not designed to be buried and will collapse, but if you fill them with water and then backfill the surrounds with a sand/cement mix this hardens into a nice compressive ring that doesn’t collapse (I use a similar method on my rain tanks which are much bigger and deeper and it is working a treat). A word of warning though if you have a high water table and then tanks are empty they do tend to want to float.
The picture shows the backfilling process with the 40mm(3/4”) in and overflow not yet connected. The overflow is connected to the sewer through a standard u trap to keep smelly gases in check.
The pump was then installed with a non-return valve right at the bottom which stops the pump becoming de-primed.

Sump View showing float switch
Also in the photo is the float switch which allows the tank to fill about halfway before it turns the pump on. On reaching empty it then turns the pump off again. It is a simple mechanical switch and is simply wired to the pump circuit in series.
Finished product :
Total cost of project : R 2000 ~ $200 give or take

Finished product
A note on the sprinkler – I decided to keep it simple and I have an outlet in one of the beds with a long length of hose so it can be moved around. The sprinkler is a simple one with a large nozzle which won’t block easily.